A Step-by-Step Guide to Writing UI Tests for Android
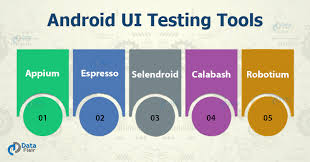
 UI testing is a critical part of Android development that ensures your application’s user interface behaves correctly. By automating UI tests, you can verify the functionality of your app from a user’s perspective, ensuring all UI components interact as expected. This guide will walk you through writing UI tests for your Android application using Espresso, an Android UI testing framework.
What is UI Testing?
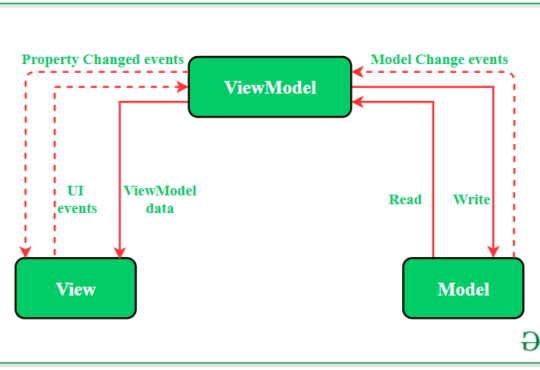
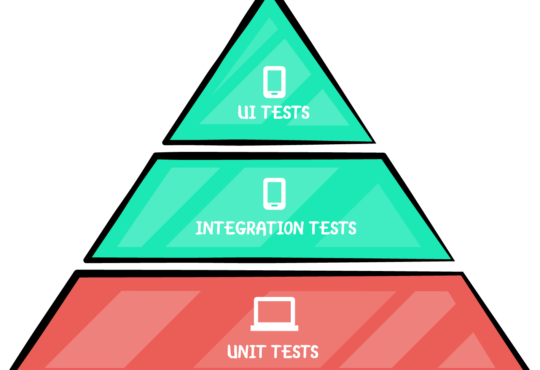
UI testing involves testing the graphical user interface of an application to ensure it meets its specifications and provides a seamless user experience. Unlike unit tests that test individual components in isolation, UI tests simulate real user interactions.Why UI Testing?
- User Experience Validation: Ensures that the application behaves as expected from a user’s perspective.
- Regression Testing: Detects issues that might arise from changes in the codebase.
- Automation: Reduces the need for manual testing, making the development process more efficient.
- Comprehensive Coverage: Tests the integration of various UI components.
Setting Up Your Android Project for UI Testing
- Add Dependencies: Ensure your
build.gradlefile includes the necessary dependencies for Espresso and AndroidX Test libraries.
dependencies {
    // Espresso dependencies
    androidTestImplementation 'androidx.test.espresso:espresso-core:3.4.0'
    androidTestImplementation 'androidx.test.espresso:espresso-intents:3.4.0'

    // AndroidX Test dependencies
    androidTestImplementation 'androidx.test.ext:junit:1.1.3'
    androidTestImplementation 'androidx.test:runner:1.4.0'
    androidTestImplementation 'androidx.test:rules:1.4.0'
}
- Directory Structure: Create a directory named
androidTestundersrcto place your UI test files. This is where you’ll write your test cases.
- src
  - main
  - androidTest
    - java
      - com
        - yourpackage
Writing Your First UI Test
Let’s consider a simple example where we have aMainActivity with a button that opens a SecondActivity.
MainActivity.java
public class MainActivity extends AppCompatActivity {
    @Override
    protected void onCreate(Bundle savedInstanceState) {
        super.onCreate(savedInstanceState);
        setContentView(R.layout.activity_main);

        Button button = findViewById(R.id.button);
        button.setOnClickListener(v -> {
            Intent intent = new Intent(MainActivity.this, SecondActivity.class);
            startActivity(intent);
        });
    }
}
SecondActivity.java
public class SecondActivity extends AppCompatActivity {
    @Override
    protected void onCreate(Bundle savedInstanceState) {
        super.onCreate(savedInstanceState);
        setContentView(R.layout.activity_second);
    }
}
MainActivityTest.java
import androidx.test.ext.junit.runners.AndroidJUnit4;
import androidx.test.rule.ActivityTestRule;
import androidx.test.espresso.intent.Intents;

import org.junit.Rule;
import org.junit.Test;
import org.junit.runner.RunWith;

import static androidx.test.espresso.Espresso.onView;
import static androidx.test.espresso.action.ViewActions.click;
import static androidx.test.espresso.matcher.ViewMatchers.withId;
import static androidx.test.espresso.intent.Intents.intended;
import static androidx.test.espresso.intent.matcher.IntentMatchers.hasComponent;

@RunWith(AndroidJUnit4.class)
public class MainActivityTest {

    @Rule
    public ActivityTestRule<MainActivity> activityRule = new ActivityTestRule<>(MainActivity.class);

    @Before
    public void setUp() {
        Intents.init();
    }

    @After
    public void tearDown() {
        Intents.release();
    }

    @Test
    public void testButtonClickOpensSecondActivity() {
        // Perform click on button
        onView(withId(R.id.button)).perform(click());

        // Verify that the SecondActivity is opened
        intended(hasComponent(SecondActivity.class.getName()));
    }
}
Explanation:
@RunWith(AndroidJUnit4.class)specifies that the test should be run using the AndroidJUnit4 runner.ActivityTestRulelaunches the activity under test.onView(withId(R.id.button)).perform(click())performs a click action on the button with the specified ID.intended(hasComponent(SecondActivity.class.getName()))checks that theSecondActivityis launched after the button click.
Running Your UI Tests
You can run your UI tests directly from Android Studio:- Right-click on the test file or directory in the Project view.
- Select
Run 'Tests in ...'.
./gradlew connectedAndroidTest
Advanced UI Testing Techniques
- Handling Asynchronous Operations: Use
IdlingResourceto synchronize Espresso with background operations. - Custom Matchers: Create custom matchers to interact with complex UI components.
- Espresso Intents: Validate and stub intents to isolate components and test specific scenarios.
Need Debugging? – Try RobotQA and Start Debugging on Real Devices. Download Plugin
Example: Handling Asynchronous Operations
NetworkIdlingResource.javapublic class NetworkIdlingResource implements IdlingResource {
private ResourceCallback resourceCallback;
@Override
public String getName() {
return NetworkIdlingResource.class.getName();
}
@Override
public boolean isIdleNow() {
// Implement logic to determine if the resource is idle
return false; // For demonstration, always return false
}
@Override
public void registerIdleTransitionCallback(ResourceCallback callback) {
this.resourceCallback = callback;
}
// Method to call when the resource transitions to idle
public void setIdleState(boolean isIdle) {
if (isIdle && resourceCallback != null) {
resourceCallback.onTransitionToIdle();
}
}
}
Using IdlingResource in Tests
@Test
public void testAsyncOperation() {
    NetworkIdlingResource idlingResource = new NetworkIdlingResource();
    IdlingRegistry.getInstance().register(idlingResource);

    // Perform actions that trigger async operations

    // Unregister the idling resource
    IdlingRegistry.getInstance().unregister(idlingResource);
}