 When developing Android applications, one of the fundamental tasks is to design user interfaces (UI) that are both intuitive and visually appealing. The
 LinearLayout is one of the most commonly used layout managers in Android for creating flexible UI designs. In this blog, we'll explore how to effectively use LinearLayout to build a responsive and structured UI for your Android app.
What is LinearLayout?
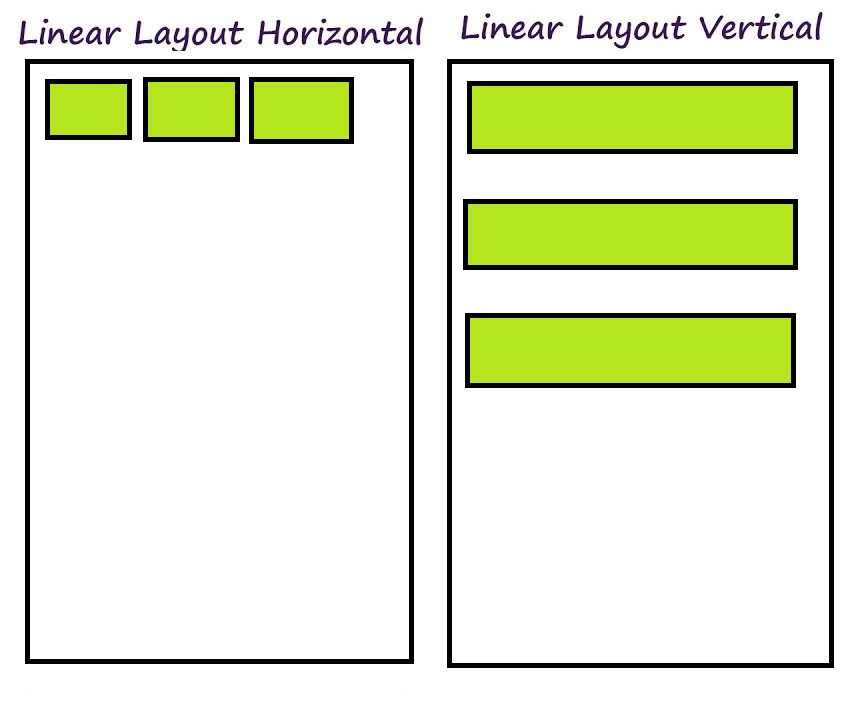
LinearLayout is a view group that aligns all children in a single direction, either vertically or horizontally. It is part of the Android layout framework, which helps in organizing the UI elements in a simple linear manner.
Key Attributes of LinearLayout
android:orientation: Defines the direction of the layout, either vertical or horizontal.android:layout_widthandandroid:layout_height: Specifies the size of the layout.android:layout_weight: Controls the proportion of space that each child takes up within the parent layout.android:gravity: Defines how child views are positioned within the LinearLayout.
Steps to Implement a Design with LinearLayout
Let's walk through the process of creating a simple user interface usingLinearLayout.
Step 1: Setting Up the Project
- Create a new Android project in Android Studio.
- Open the XML layout file (usually
activity_main.xml).
Step 2: Define the LinearLayout
In your XML layout file, start by defining aLinearLayout as the root element.
|
1 2 3 4 5 6 7 8 9 10 11 |
<LinearLayout xmlns:android="http://schemas.android.com/apk/res/android" android:layout_width="match_parent" android:layout_height="match_parent" android:orientation="vertical" android:padding="16dp" android:gravity="center"> <!-- UI elements will go here --> </LinearLayout> |
Step 3: Adding Child Views
Next, add child views to yourLinearLayout. For example, let's add a TextView, an EditText, and a Button.
|
1 2 3 4 5 6 7 8 9 10 11 12 13 14 15 16 17 18 19 20 21 22 23 24 25 26 |
<LinearLayout xmlns:android="http://schemas.android.com/apk/res/android" android:layout_width="match_parent" android:layout_height="match_parent" android:orientation="vertical" android:padding="16dp" android:gravity="center"> <TextView android:layout_width="wrap_content" android:layout_height="wrap_content" android:text="Enter your name:" android:textSize="18sp"/> <EditText android:layout_width="match_parent" android:layout_height="wrap_content" android:hint="Name" android:layout_marginTop="8dp"/> <Button android:layout_width="wrap_content" android:layout_height="wrap_content" android:text="Submit" android:layout_marginTop="16dp"/> </LinearLayout> |
Step 4: Using Layout Weight
To make the UI more flexible, you can use theandroid:layout_weight attribute. This is particularly useful when you want to distribute space evenly among child views.
|
1 2 3 4 5 6 7 8 9 10 11 12 13 14 15 16 17 18 19 20 21 22 23 24 25 26 27 28 29 |
<LinearLayout xmlns:android="http://schemas.android.com/apk/res/android" android:layout_width="match_parent" android:layout_height="match_parent" android:orientation="vertical" android:padding="16dp" android:gravity="center"> <TextView android:layout_width="0dp" android:layout_height="wrap_content" android:layout_weight="1" android:text="Enter your name:" android:textSize="18sp"/> <EditText android:layout_width="0dp" android:layout_height="wrap_content" android:layout_weight="2" android:hint="Name" android:layout_marginTop="8dp"/> <Button android:layout_width="0dp" android:layout_height="wrap_content" android:layout_weight="1" android:text="Submit" android:layout_marginTop="16dp"/> </LinearLayout> |
TextView, EditText, and Button will share the available width of the screen in the ratio of 1:2:1 respectively.
Need testing? – Try RobotQA and Start Testing on Real Devices. Start Free Trial
Best Practices
- Avoid nesting too many LinearLayouts: This can lead to performance issues. Instead, consider using
ConstraintLayoutfor more complex layouts. - Use weights wisely: Overusing weights can also lead to performance issues. Try to balance the use of weights and fixed dimensions.
- Use margins and padding: Proper use of margins and padding can help to create a visually appealing design.
Conclusion
UsingLinearLayout is a straightforward and effective way to create structured layouts in Android. By understanding its key attributes and best practices, you can design responsive and elegant UIs for your applications. Experiment with different orientations, weights, and child views to get a feel for how LinearLayout can be leveraged to meet your design needs. Happy coding!