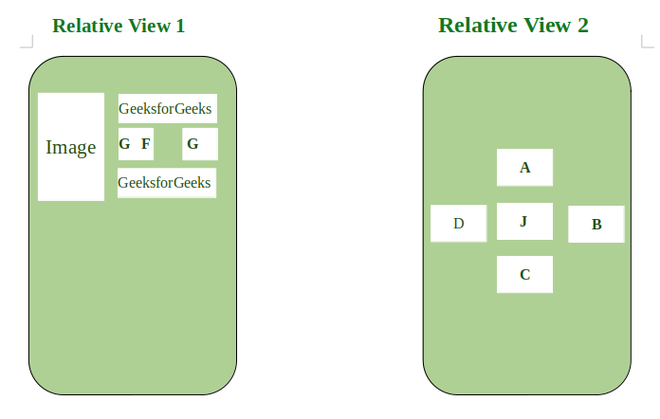
 Creating visually appealing and user-friendly interfaces is a cornerstone of Android app development. One of the most versatile layout managers in Android is
 RelativeLayout, which allows you to position child views relative to each other or to the parent. This blog will guide you through the essentials of using RelativeLayout, illustrating how to implement a design with practical examples.
What is RelativeLayout?
RelativeLayout is a view group that displays child views in relative positions. Unlike other layouts that position children in linear or grid patterns, RelativeLayout enables you to place children in relation to one another or the parent container. This flexibility makes it a powerful tool for creating complex layouts without deeply nested hierarchies.
Key Attributes of RelativeLayout
android:layout_above: Positions the view above another view.android:layout_below: Positions the view below another view.android:layout_toLeftOf: Positions the view to the left of another view.android:layout_toRightOf: Positions the view to the right of another view.android:layout_alignParentTop: Aligns the view to the top of the parent.android:layout_alignParentBottom: Aligns the view to the bottom of the parent.android:layout_alignParentLeft: Aligns the view to the left of the parent.android:layout_alignParentRight: Aligns the view to the right of the parent.android:layout_centerInParent: Centers the view within the parent.android:layout_centerHorizontal: Centers the view horizontally within the parent.android:layout_centerVertical: Centers the view vertically within the parent.
Implementing a Design with RelativeLayout
Let's walk through the process of creating a simple user interface usingRelativeLayout.
Step 1: Setting Up the Project
- Create a new Android project in Android Studio.
- Open the XML layout file (usually
activity_main.xml).
Step 2: Define the RelativeLayout
In your XML layout file, start by defining aRelativeLayout as the root element.
|
1 2 3 4 5 6 7 8 9 |
<RelativeLayout xmlns:android="http://schemas.android.com/apk/res/android" android:layout_width="match_parent" android:layout_height="match_parent" android:padding="16dp"> <!-- UI elements will go here --> </RelativeLayout> |
Step 3: Adding Child Views
Let's add aTextView, an EditText, and a Button to the RelativeLayout.
|
1 2 3 4 5 6 7 8 9 10 11 12 13 14 15 16 17 18 19 20 21 22 23 24 25 26 27 28 29 30 31 32 33 |
<RelativeLayout xmlns:android="http://schemas.android.com/apk/res/android" android:layout_width="match_parent" android:layout_height="match_parent" android:padding="16dp"> <TextView android:id="@+id/label" android:layout_width="wrap_content" android:layout_height="wrap_content" android:text="Enter your name:" android:textSize="18sp" android:layout_alignParentTop="true" android:layout_centerHorizontal="true"/> <EditText android:id="@+id/name" android:layout_width="match_parent" android:layout_height="wrap_content" android:hint="Name" android:layout_below="@id/label" android:layout_marginTop="16dp" android:layout_centerHorizontal="true"/> <Button android:layout_width="wrap_content" android:layout_height="wrap_content" android:text="Submit" android:layout_below="@id/name" android:layout_marginTop="16dp" android:layout_centerHorizontal="true"/> </RelativeLayout> |
Need Debugging? – Try RobotQA and Start Debugging on Real Devices. Download Plugin
Example Explained
- TextView: Positioned at the top center of the parent using
android:layout_alignParentTop="true"andandroid:layout_centerHorizontal="true". - EditText: Positioned below the
TextViewusingandroid:layout_below="@id/label"and centered horizontally withandroid:layout_centerHorizontal="true". - Button: Positioned below the
EditTextusingandroid:layout_below="@id/name"and centered horizontally withandroid:layout_centerHorizontal="true".
Advanced Usage: Relative Positioning
To illustrate more complex positioning, let’s add anotherButton to the layout, which will be positioned to the right of the first button.
|
1 2 3 4 5 6 7 8 9 10 11 12 13 14 15 16 17 18 19 20 21 22 23 24 25 26 27 28 29 30 31 32 33 34 35 36 37 38 39 40 41 42 |
<RelativeLayout xmlns:android="http://schemas.android.com/apk/res/android" android:layout_width="match_parent" android:layout_height="match_parent" android:padding="16dp"> <TextView android:id="@+id/label" android:layout_width="wrap_content" android:layout_height="wrap_content" android:text="Enter your name:" android:textSize="18sp" android:layout_alignParentTop="true" android:layout_centerHorizontal="true"/> <EditText android:id="@+id/name" android:layout_width="match_parent" android:layout_height="wrap_content" android:hint="Name" android:layout_below="@id/label" android:layout_marginTop="16dp" android:layout_centerHorizontal="true"/> <Button android:id="@+id/submit" android:layout_width="wrap_content" android:layout_height="wrap_content" android:text="Submit" android:layout_below="@id/name" android:layout_marginTop="16dp" android:layout_centerHorizontal="true"/> <Button android:layout_width="wrap_content" android:layout_height="wrap_content" android:text="Cancel" android:layout_toRightOf="@id/submit" android:layout_alignTop="@id/submit" android:layout_marginStart="8dp"/> </RelativeLayout> |
- The new
Button(Cancel) is positioned to the right of the firstButton(Submit) usingandroid:layout_toRightOf="@id/submit". - It aligns with the top of the Submit button using
android:layout_alignTop="@id/submit".
Best Practices
- Minimize Nesting: Avoid deeply nested
RelativeLayoutstructures to improve performance and maintainability. - Use Descriptive IDs: Assign descriptive IDs to views to make your layout more readable.
- Combine with Other Layouts: Sometimes, combining
RelativeLayoutwith other layouts likeLinearLayoutorConstraintLayoutcan yield better results for complex UIs.
Conclusion
RelativeLayout is a powerful tool for creating flexible and dynamic UIs in Android. By understanding and utilizing its key attributes, you can design interfaces that adapt well to different screen sizes and orientations. Experiment with various positioning techniques and combine them with other layouts to create efficient and aesthetically pleasing designs. Happy coding!