Understanding iOS XCUItest: A Guide and Simple Tutorial
Introduction
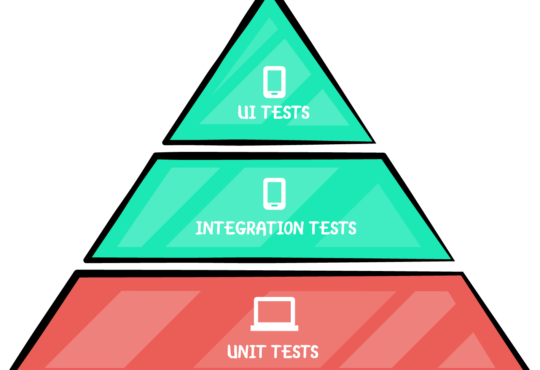
Automated testing is an essential aspect of modern app development, ensuring that applications function correctly and efficiently. For iOS app development, Apple provides a robust testing framework known as XCTest, which includes the XCUItest module for UI testing. In this blog, we’ll explore what XCUItest is and provide a simple tutorial to get you started with UI testing for your iOS apps.What is XCUItest?
XCUItest is a UI testing framework provided by Apple that allows developers to write tests for the user interface of their iOS applications. It extends the XCTest framework and provides tools to interact with and verify the behavior of UI elements in your app. XCUItest helps ensure that your app’s user interface behaves as expected under various conditions and interactions.Key Features of XCUItest
- Integration with Xcode: XCUItest is integrated into Xcode, Apple’s development environment, making it easy to write, run, and manage tests.
- Accessibility Identification: It uses accessibility identifiers to locate and interact with UI elements, promoting good accessibility practices.
- Automation: Automates user interactions like taps, swipes, and text entry, enabling thorough and repetitive testing.
- Parallel Testing: Supports running tests on multiple devices simultaneously, speeding up the testing process.
Need Debugging? – Try RobotQA and Start Debugging on Real Devices. Download Plugin
Setting Up XCUItest
Before diving into writing tests, let’s set up XCUItest in an Xcode project.- Create a New Xcode Project: Open Xcode and create a new iOS project. Choose a template, such as “Single View App,” and configure your project settings.
- Add a UI Testing Target:
- Go to your project settings in Xcode.
- Click the “+” button at the bottom of the target list.
- Select “iOS UI Testing Bundle” and click “Next.”
- Name your testing target (e.g., “MyAppUITests”) and finish the setup.
- Configure the Testing Target:
- In the newly created testing target, open the
MyAppUITests.swiftfile. - Import the
XCTestframework and your app’s module.
- In the newly created testing target, open the
Writing Your First XCUItest
Let’s write a simple test that verifies a button tap changes a label’s text.- Add Accessibility Identifiers: In your main app target, assign accessibility identifiers to the UI elements you want to interact with. For example, in
ViewController.swift:
@IBOutlet weak var myLabel: UILabel!
@IBOutlet weak var myButton: UIButton!

override func viewDidLoad() {
    super.viewDidLoad()
    myLabel.accessibilityIdentifier = "myLabel"
    myButton.accessibilityIdentifier = "myButton"
}
- Write the Test: In the
MyAppUITests.swiftfile, write the test method:
import XCTest

class MyAppUITests: XCTestCase {

    override func setUpWithError() throws {
        continueAfterFailure = false
        let app = XCUIApplication()
        app.launch()
    }

    override func tearDownWithError() throws {
        // Code to execute after each test method
    }

    func testButtonTapChangesLabelText() throws {
        let app = XCUIApplication()
        let button = app.buttons["myButton"]
        let label = app.staticTexts["myLabel"]

        // Ensure the initial state is correct
        XCTAssertEqual(label.label, "Initial Text")

        // Perform the button tap
        button.tap()

        // Verify the label text changes
        XCTAssertEqual(label.label, "Button Tapped")
    }
}
-
- Run the Test:
- Select the
MyAppUITestsscheme. - Press Command-U to run the tests.
- Xcode will build your app, launch it in the simulator, and execute the test.
- Select the
- Run the Test:
Conclusion
XCUItest is a powerful tool for automating UI testing in iOS applications. By integrating it into your development workflow, you can ensure your app’s user interface behaves as expected, providing a better experience for your users. With the setup and simple test example provided in this tutorial, you are well on your way to leveraging XCUItest for robust UI testing in your iOS projects.Happy testing!