Using Java Interface for Event Messaging in Android
 In Android development, handling interactions between different components efficiently and cleanly is essential for building robust applications. Java interfaces provide an elegant way to achieve this by allowing you to define a contract for event handling that can be implemented by various classes. This helps in decoupling components and makes the code more modular and maintainable. In this blog, we’ll explore how to use Java interfaces and interface instances in an Android activity to handle event messages.
Understanding Java Interfaces
An interface in Java is a reference type that is similar to a class. It can contain only constants, method signatures, default methods, static methods, and nested types. Interfaces cannot contain instance fields or constructors. They are used to define a contract that other classes must follow.Benefits of Using Interfaces for Event Messaging
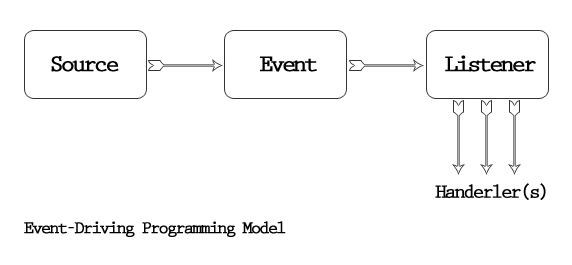
- Decoupling: Interfaces help in decoupling the event source from the event handler, allowing them to evolve independently.
- Flexibility: Any class can implement the interface, making it easy to switch event handlers.
- Maintainability: Interfaces make the code easier to read and maintain by clearly defining the methods to be implemented.
Need Debugging? – Try RobotQA and Start Debugging on Real Devices. Download Plugin
Example Scenario
Let’s consider a scenario where we have a button in an activity that, when clicked, triggers an event handled by a separate class. We’ll use an interface to manage this event.Step-by-Step Implementation
Step 1: Define the Interface
First, define an interface that declares the method to handle the event.public interface OnButtonClickListener {
void onButtonClick(String message);
}
Step 2: Implement the Interface
Create a class that implements this interface. This class will handle the button click event.public class ButtonClickHandler implements OnButtonClickListener {
@Override
public void onButtonClick(String message) {
// Handle the button click event
System.out.println("Button clicked with message: " + message);
}
}
Step 3: Set Up the Activity
In your activity, define a method to set the listener and handle the button click event. The activity will hold an instance of the interface to delegate the event handling.public class MainActivity extends AppCompatActivity {
private OnButtonClickListener buttonClickListener;
@Override
protected void onCreate(Bundle savedInstanceState) {
super.onCreate(savedInstanceState);
setContentView(R.layout.activity_main);
// Instantiate the button click handler
ButtonClickHandler handler = new ButtonClickHandler();
setOnButtonClickListener(handler);
// Find the button and set up the click event
Button button = findViewById(R.id.myButton);
button.setOnClickListener(new View.OnClickListener() {
@Override
public void onClick(View v) {
if (buttonClickListener != null) {
buttonClickListener.onButtonClick("Hello from the button!");
}
}
});
}
public void setOnButtonClickListener(OnButtonClickListener listener) {
this.buttonClickListener = listener;
}
}
Step 4: Define the Layout
Create the layout file (activity_main.xml) for the activity.
<?xml version="1.0" encoding="utf-8"?>
<RelativeLayout xmlns:android="http://schemas.android.com/apk/res/android"
    android:layout_width="match_parent"
    android:layout_height="match_parent"
    android:padding="16dp">

    <Button
        android:id="@+id/myButton"
        android:layout_width="wrap_content"
        android:layout_height="wrap_content"
        android:text="Click Me" />
</RelativeLayout>
Detailed Explanation
- Interface Definition: The
OnButtonClickListenerinterface defines a single methodonButtonClick(String message). Any class that wants to handle button click events must implement this interface. - Interface Implementation: The
ButtonClickHandlerclass implements theOnButtonClickListenerinterface. It provides the actual logic for handling button click events in theonButtonClickmethod. - Activity Setup: In the
MainActivity, we create an instance ofButtonClickHandlerand set it as the button click listener. When the button is clicked, theonButtonClickmethod of theButtonClickHandlerinstance is called, passing the event message. - Layout Definition: The
activity_main.xmllayout file defines a simpleRelativeLayoutwith aButton. When the button is clicked, the event is propagated to theOnButtonClickListenerinstance.