Implementing a Custom Adapter for ListView in Android
 When it comes to displaying lists of data in Android, the
 ListView widget is a common choice. However, to customize the appearance of each item in the list, you need to implement a custom adapter. In this blog, we’ll walk through the steps to create a custom adapter for ListView in Android, allowing you to display complex data structures with custom layouts.
Understanding Custom Adapters
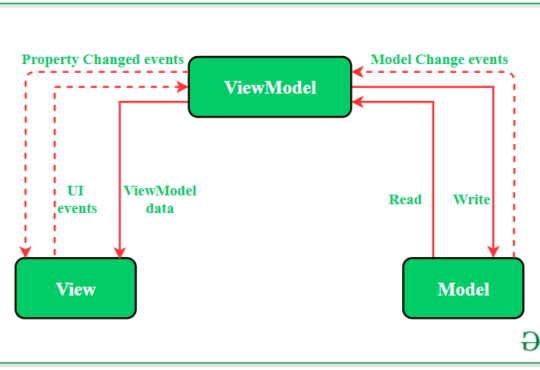
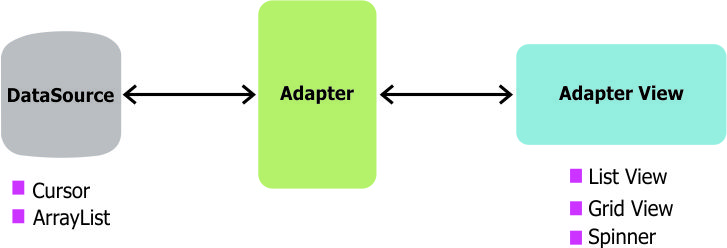
A custom adapter acts as a bridge between your data source and theListView, responsible for creating a view for each item in the list. By creating a custom adapter, you have full control over the appearance and behavior of each list item.
Step 1: Define the Data Model
Before creating the custom adapter, define the data model that represents each item in the list. This could be a simple class or a more complex data structure.public class CustomItem {
private String title;
private String description;
public CustomItem(String title, String description) {
this.title = title;
this.description = description;
}
public String getTitle() {
return title;
}
public String getDescription() {
return description;
}
}
Step 2: Create the Custom Adapter
Next, create a custom adapter by extending theBaseAdapter class. Override methods such as getCount(), getItem(), and getView() to define how data is displayed in the ListView.
public class CustomAdapter extends BaseAdapter {
    private Context context;
    private List<CustomItem> itemList;

    public CustomAdapter(Context context, List<CustomItem> itemList) {
        this.context = context;
        this.itemList = itemList;
    }

    @Override
    public int getCount() {
        return itemList.size();
    }

    @Override
    public Object getItem(int position) {
        return itemList.get(position);
    }

    @Override
    public long getItemId(int position) {
        return position;
    }

    @Override
    public View getView(int position, View convertView, ViewGroup parent) {
        if (convertView == null) {
            convertView = LayoutInflater.from(context).inflate(R.layout.list_item, parent, false);
        }

        CustomItem item = itemList.get(position);

        TextView titleTextView = convertView.findViewById(R.id.titleTextView);
        TextView descriptionTextView = convertView.findViewById(R.id.descriptionTextView);

        titleTextView.setText(item.getTitle());
        descriptionTextView.setText(item.getDescription());

        return convertView;
    }
}
Step 3: Create the Layout for List Item
Create a layout file (list_item.xml) for the custom list item. This layout defines the appearance of each item in the ListView.
<!-- list_item.xml -->
<LinearLayout xmlns:android="http://schemas.android.com/apk/res/android"
    android:layout_width="match_parent"
    android:layout_height="wrap_content"
    android:orientation="vertical"
    android:padding="16dp">

    <TextView
        android:id="@+id/titleTextView"
        android:layout_width="match_parent"
        android:layout_height="wrap_content"
        android:textSize="18sp"
        android:textStyle="bold"/>

    <TextView
        android:id="@+id/descriptionTextView"
        android:layout_width="match_parent"
        android:layout_height="wrap_content"
        android:textSize="14sp"
        android:textColor="@android:color/darker_gray"/>
</LinearLayout>
Step 4: Implementing the Custom Adapter in Activity
Finally, use the custom adapter in your activity to populate theListView with data.
public class MainActivity extends AppCompatActivity {
    private ListView listView;
    private CustomAdapter adapter;
    private List<CustomItem> itemList;

    @Override
    protected void onCreate(Bundle savedInstanceState) {
        super.onCreate(savedInstanceState);
        setContentView(R.layout.activity_main);

        listView = findViewById(R.id.listView);
        itemList = new ArrayList<>();
        itemList.add(new CustomItem("Title 1", "Description 1"));
        itemList.add(new CustomItem("Title 2", "Description 2"));
        // Add more items as needed

        adapter = new CustomAdapter(this, itemList);
        listView.setAdapter(adapter);
    }
}
Need Debugging? – Try RobotQA and Start Debugging on Real Devices. Download Plugin
Conclusion
Implementing a custom adapter forListView in Android allows you to display lists of data with custom layouts and appearance. By following the steps outlined in this blog, you can create a custom adapter to handle complex data structures and customize the appearance of each list item. Custom adapters provide flexibility and control over how data is presented in your Android application. Happy coding!